tkinter 라이브러리를 활용한 GUI 환경의 계산기 프로그램을 만들어 보았다.
소스를 살펴보자
import tkinter as tk


class Calc:
    def __init__(self, root):
        self.num1 = None
        self.num2 = None
        self.op = None
        self.result = None
        self.root = root
        self.uiInit()

    def uiInit(self):
        self.root.title('계산기')

        #숫자가 표기될 레이블 생성 및 셋팅
        self.label = tk.Label(self.root, width=25)
        self.label.grid(row=0, column=0, columnspan=4)

        # 각 버튼을 셋팅한다.
        self.b1 = tk.Button(self.root, text='1', width=25, command=lambda: self.numBtn('1'))
        self.b1.grid(row=1, column=0)
        self.b2 = tk.Button(self.root, text='2', width=25, command=lambda: self.numBtn('2'))
        self.b2.grid(row=1, column=1)
        self.b3 = tk.Button(self.root, text='3', width=25, command=lambda: self.numBtn('3'))
        self.b3.grid(row=1, column=2)
        self.b4 = tk.Button(self.root, text='+', width=25, command=lambda: self.opBtn('+'))
        self.b4.grid(row=1, column=3)
        self.b5 = tk.Button(self.root, text='4', width=25, command=lambda: self.numBtn('4'))
        self.b5.grid(row=2, column=0)
        self.b6 = tk.Button(self.root, text='5', width=25, command=lambda: self.numBtn('5'))
        self.b6.grid(row=2, column=1)
        self.b7 = tk.Button(self.root, text='6', width=25, command=lambda: self.numBtn('6'))
        self.b7.grid(row=2, column=2)
        self.b8 = tk.Button(self.root, text='-', width=25, command=lambda: self.opBtn('-'))
        self.b8.grid(row=2, column=3)
        self.b9 = tk.Button(self.root, text='7', width=25, command=lambda: self.numBtn('7'))
        self.b9.grid(row=3, column=0)
        self.b10 = tk.Button(self.root, text='8', width=25, command=lambda: self.numBtn('8'))
        self.b10.grid(row=3, column=1)
        self.b11 = tk.Button(self.root, text='9', width=25, command=lambda: self.numBtn('9'))
        self.b11.grid(row=3, column=2)
        self.b12 = tk.Button(self.root, text='*', width=25, command=lambda: self.opBtn('*'))
        self.b12.grid(row=3, column=3)
        self.b13 = tk.Button(self.root, text='0', width=25, command=lambda: self.numBtn('0'))
        self.b13.grid(row=4, column=0)
        self.b14 = tk.Button(self.root, text='C', width=25, command=lambda: self.clear())
        self.b14.grid(row=4, column=1)
        self.b15 = tk.Button(self.root, text='=', width=25, command=lambda: self.resultBtn())
        self.b15.grid(row=4, column=2)
        self.b16 = tk.Button(self.root, text='/', width=25, command=lambda: self.opBtn('/'))
        self.b16.grid(row=4, column=3)

    # C 클릭 이벤트 함수
    def clear(self):
        self.num1 = None
        self.num2 = None
        self.op = None
        self.label.config(text='')

    # 숫자 클릭 이벤트 함수
    def numBtn(self, num):
        txt = self.label.cget('text')
        txt += num
        if self.op is None:
            self.num1 = txt
            self.label.config(text=self.num1)
        else:
            self.num2 = txt
            self.label.config(text=self.num2)

    # 연산자 클릭 이벤트 함수
    def opBtn(self, op):
        self.op = op
        self.label.config(text='')

    # = 버튼 클릭 이벤트 함수
    def resultBtn(self):
        if self.num1 is not None and self.num2 is not None:
            if self.op == '+':
                self.num1 = int(self.num1) + int(self.num2)
                self.num2= None
                self.label.config(text=self.num1)
            elif self.op == '-':
                self.num1 = int(self.num1) - int(self.num2)
                self.num2 = None
                self.label.config(text=self.num1)
            elif self.op == '*':
                self.num1 = int(self.num1) * int(self.num2)
                self.num2 = None
                self.label.config(text=self.num1)
            elif self.op == '/':
                self.num1 = int(self.num1) / int(self.num2)
                self.num2 = None
                self.label.config(text=self.num1)


def main():
    root = tk.Tk()
    Calc(root)
    root.mainloop()


main()
각 버튼을 하드 코딩하여 생성했지만, 좀 더 효율적으로 생성하는 방법을 생각해 봐야겠다.
<실행 화면>
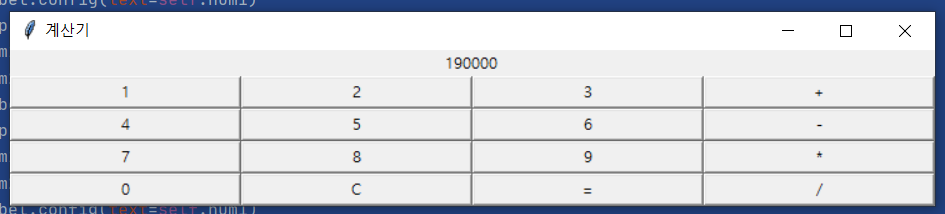
연산자를 입력했을 때 계산식이 사라져서 현재 어떤 계산을 하고 있는지 확인할 수가 없었다.
좀 더 보완하여 계산식을 따로 보여주는 레이블을 추가해야 할 것 같다.
<마침>
tkinter를 사용해보니 좀 불편한 감이 있다.
각 위젯들의 배치를 일일이 좌표 설정이나 그리드에서 행과 열을 설정해주어야 하는 불편함이다.
pyqy라는 라이브러리는 좀 더 손쉽게 위젯을 생성하고 배치할 수 있는 기능이 있다고 들었는데 다음엔 pyqt에 대해 학습해봐야겠다.
'프로그래밍 > 파이썬' 카테고리의 다른 글
| 파이썬 스레드 (Thread) (0) | 2020.12.17 |
|---|---|
| GUI 멀티 채팅 프로그램 (TKinter, Thread, Socket) (1) | 2020.12.17 |
| TKinter 기본 (파이썬 GUI) (0) | 2020.12.17 |
| 파이썬 소켓(TCP) (0) | 2020.12.15 |
| 제어문 - IF (0) | 2020.11.05 |


댓글